
Tuesday, March 13, 2012
Why I have been M.I.A.
UNL (and the entire University of Nebraska system) is changing from Lotus Notes to Microsoft Outlook and Office 365. It's been a major undertaking and we'll be at this for a while. This has drawn my attention away from my blog and I apologize. I'll begin posting again, but you will now notice I'm including Outlook with my tips.


Wednesday, February 29, 2012
Wednesday, October 5, 2011
Take Attendance in Excel (and so much more)
In training, I need to take attendance. I can have a list in Excel that looks like the one below. But, by using Conditional Formatting, I can get a better looking list that is easy to filter/sort to what I need. Here’s how I do that.


The first step is to change how I use the “Attended” column. Instead of x’s, I need to enter 1’s and 0’s. Excel is designed around the use of numbers and this will only work if I do the same. In this instance, I use 1’s for those who have attended and 0’s for those who were absent.
- Select the column with the values to format. In my example, I selected column D.
- On the Home tab, Styles group, click Conditional Formatting and select the 3 Symbols (Uncircled) under the Indicators options. (It's the green check, yellow explanation point and red X.)
- Click Conditional Formatting again and this time select Manage Rules… at the bottom of the gallery to open the dialog box
- Click the Edit Rule… button.
- Select the Show Icon Only check box. Click OK to finish the rule, and OK apply.
Friday, September 30, 2011
Monday, August 1, 2011
Microsoft Word: Document Clean-up
I was recently assisting someone in the clean-up of a rather large document. After setting a style for the document text to have a first line indent, we needed to get rid of the tab character used to originally create this indent. You know I’m all about the shortcuts, so here’s how we did it.
Set a first line indent for the document text
Set a first line indent for the document text
- While the cursor is in the first paragraph of text, grab the top part of the left margin boundary marker on the ruler bar and move it to the desired location.

- [You can also click the dialog box launcher of the Paragraph group and change the Indentation, Special: to First line and By: (any amount).]
- In the Styles group on the Home tab, right-click the Normal style and select Update Normal to Match Selection.
Remove all tab characters
- In the Editing group of the Home tab, click Replace.
If you see the More >> button, click it to view more options. - Be sure your cursor is in the Find what: field. Click the Special button at the bottom and select Tab Character. You will see ^t in the field to represent the tab.
- Leave the Replace with: field empty. This will replace all tab characters with nothing, thus deleting them.
- Click the Replace All button.
Friday, July 1, 2011
Microsoft Excel: Highlight all cells referenced by a formula
When helping a client, I often look at worksheets I am totally unfamilar with. This makes it hard for me to know what’s going on to easily find the problem. To help me understand how cells and formulas are interrealted, I will highlight all the cells referenced by a formula.
To do this, select a cell with a formula and press Ctrl+[ (open-square-bracket). Excel highlights all the cells referenced by the formula. Use Enter and/or Tab (Shift+Enter and/or Shift+Tab to shift into reverse) to move among the selected cells.
But what if you want to do the reverse, and see the formulas that reference the a cell? You guessed it, select the cell, and press Ctrl+] (close-square-bracket).
To do this, select a cell with a formula and press Ctrl+[ (open-square-bracket). Excel highlights all the cells referenced by the formula. Use Enter and/or Tab (Shift+Enter and/or Shift+Tab to shift into reverse) to move among the selected cells.
But what if you want to do the reverse, and see the formulas that reference the a cell? You guessed it, select the cell, and press Ctrl+] (close-square-bracket).
Wednesday, June 1, 2011
No Handouts from PowerPoint
PowerPoint is for presentations. Let me say that again and you disect what I’m saying: PowerPoint is for presentations, not handouts. A copy of miniture slides with tiny little lines next to each one is NOT a handout; regardless what PowerPoint says.
Handouts are to be more indepth and expand on what the presentation is. For this, you should be creating handouts in a program such as Word. “But, I want the visual and I’m too lazy to copy and paste everything from PowerPoint to Word,” you say. Quit your whining and use the Create Handouts option in PowerPoint.
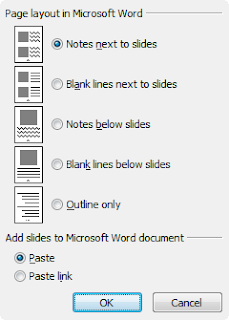 With your presentation open, go to the File tab, click Save & Send, then click Create Handouts and click the Create Handouts button. (In 2007, click the Microsoft Office Button, point to Publish, and then click Create Handouts in Microsoft Office Word.) All that is left is to select your layout and click OK.
Small pictures of your slides will be included with your text. I suggest you delete slides that are not visually important to the text, such as where text is duplicated. Slides can be resized to make charts and images more readable. Slide titles will format as a Heading 1 style. Text on the slides will be formatted as Heading 2, 3, etc. You will have to add the body text to make the information useful and understandable.
Handouts are to be more indepth and expand on what the presentation is. For this, you should be creating handouts in a program such as Word. “But, I want the visual and I’m too lazy to copy and paste everything from PowerPoint to Word,” you say. Quit your whining and use the Create Handouts option in PowerPoint.
 With your presentation open, go to the File tab, click Save & Send, then click Create Handouts and click the Create Handouts button. (In 2007, click the Microsoft Office Button, point to Publish, and then click Create Handouts in Microsoft Office Word.) All that is left is to select your layout and click OK.
Small pictures of your slides will be included with your text. I suggest you delete slides that are not visually important to the text, such as where text is duplicated. Slides can be resized to make charts and images more readable. Slide titles will format as a Heading 1 style. Text on the slides will be formatted as Heading 2, 3, etc. You will have to add the body text to make the information useful and understandable.
Subscribe to:
Posts (Atom)