Wednesday, October 5, 2011

Take Attendance in Excel (and so much more)

In training, I need to take attendance. I can have a list in Excel that looks like the one below. But, by using Conditional Formatting, I can get a better looking list that is easy to filter/sort to what I need. Here’s how I do that.

The first step is to change how I use the “Attended” column. Instead of x’s, I need to enter 1’s and 0’s. Excel is designed around the use of numbers and this will only work if I do the same. In this instance, I use 1’s for those who have attended and 0’s for those who were absent.
  1. Select the column with the values to format. In my example, I selected column D.
  2. On the Home tab, Styles group, click Conditional Formatting and select the 3 Symbols (Uncircled) under the Indicators options. (It's the green check, yellow explanation point and red X.)
You will see the icon and the value listed in the column together. Now to hide the value.
  1. Click Conditional Formatting again and this time select Manage Rules… at the bottom of the gallery to open the dialog box
  2. Click the Edit Rule… button.
  3. Select the Show Icon Only check box. Click OK to finish the rule, and OK apply.
The bonus is now you can filter/sort on this column. Turn on the Filter (on the Data tab) to view the filter arrows on each column heading. Click the filter for your column, move to Filter by Color and select to view only those who attended or get a list of those who were absent.

Friday, September 30, 2011

EXCEL =SUM(10,10,5)

Excel was released to the world 25 years ago today. Geek out to the history...


Monday, August 1, 2011

Microsoft Word: Document Clean-up

I was recently assisting someone in the clean-up of a rather large document. After setting a style for the document text to have a first line indent, we needed to get rid of the tab character used to originally create this indent. You know I’m all about the shortcuts, so here’s how we did it.

Set a first line indent for the document text
  1. While the cursor is in the first paragraph of text, grab the top part of the left margin boundary marker on the ruler bar and move it to the desired location.
  2. [You can also click the dialog box launcher of the Paragraph group and change the Indentation, Special: to First line and By: (any amount).] 
  3. In the Styles group on the Home tab, right-click the Normal style and select Update Normal to Match Selection.

Remove all tab characters
  1. In the Editing group of the Home tab, click Replace.
    If you see the More >> button, click it to view more options. 
  2. Be sure your cursor is in the Find what: field. Click the Special button at the bottom and select Tab Character. You will see ^t in the field to represent the tab. 
  3. Leave the Replace with: field empty. This will replace all tab characters with nothing, thus deleting them. 
  4. Click the Replace All button.
You’re done!

Friday, July 1, 2011

Microsoft Excel: Highlight all cells referenced by a formula

When helping a client, I often look at worksheets I am totally unfamilar with. This makes it hard for me to know what’s going on to easily find the problem. To help me understand how cells and formulas are interrealted, I will highlight all the cells referenced by a formula.

To do this, select a cell with a formula and press Ctrl+[ (open-square-bracket). Excel highlights all the cells referenced by the formula. Use Enter and/or Tab (Shift+Enter and/or Shift+Tab to shift into reverse) to move among the selected cells.

But what if you want to do the reverse, and see the formulas that reference the a cell? You guessed it, select the cell, and press Ctrl+] (close-square-bracket).

Wednesday, June 1, 2011

No Handouts from PowerPoint

PowerPoint is for presentations. Let me say that again and you disect what I’m saying: PowerPoint is for presentations, not handouts. A copy of miniture slides with tiny little lines next to each one is NOT a handout; regardless what PowerPoint says.

Handouts are to be more indepth and expand on what the presentation is. For this, you should be creating handouts in a program such as Word. “But, I want the visual and I’m too lazy to copy and paste everything from PowerPoint to Word,” you say. Quit your whining and use the Create Handouts option in PowerPoint.

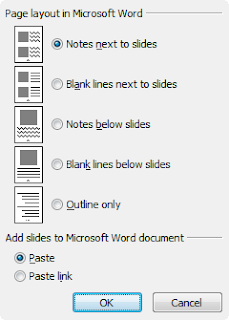
With your presentation open, go to the File tab, click Save & Send, then click Create Handouts and click the Create Handouts button. (In 2007, click the Microsoft Office Button, point to Publish, and then click Create Handouts in Microsoft Office Word.) All that is left is to select your layout and click OK.

Small pictures of your slides will be included with your text. I suggest you delete slides that are not visually important to the text, such as where text is duplicated. Slides can be resized to make charts and images more readable. Slide titles will format as a Heading 1 style. Text on the slides will be formatted as Heading 2, 3, etc. You will have to add the body text to make the information useful and understandable.

Tuesday, May 24, 2011

Interesting New Blog

At UNL, I work with an amazing bunch of students with the Student Technology Assistance Program (STAP). It's a group of students doing real work while they learn. There is also a group that teaches other students computer programs. They have recently decided to begin a blog with tips, reviews and other interesting technology related news stories from a college student point of view. I'm really excited to see what they've already done and look forward to future posts. Please check out the Innovations blog and see what they're about. You'll be glad you did.

Wednesday, May 11, 2011

Clippy is My (Ribbon) Hero

It's a fact. I'm a Ribbon Hero. I took the test to prove it, too. If you don't know what I'm talking about, you should check out Ribbon Hero 2 from Microsoft. It's an add-in that will watch what you do and you earn points as you work. You can also launch the game-based learning and it will open the Microsoft programs (OneNote, Excel, PowerPoint and Word) where you perform the tasks asked of you. Best of all, it's the return of Clippy. If you think he got a bad rap back in 1997-2003, he is back to redeem himself. You start by helping him with his resume.

It's really kind of fun and a great example of game-based learning. If you don't know how to perform a task, you can ask for a hint to help you. If you are a "power-user" you'll find this easy. Too easy. If you are a casual user and want to explore a little more of what you might not know, this is definitely for you.

I'd recommend Ribbon Hero 2 for anyone who needs to brush up on their skills because it does have varying levels from beginning to advanced and covers a variety of tasks. You also can pick and choose your tasks and still progress through the levels so everyone can have a sense of accomplishment. For example, I'm not a OneNote user, so I chose the tasks for Word, Excel and PowerPoint and was able to work through the levels. When I was done, I was able to go back and tackle the tasks I skipped in those programs, too. I look forward to learning more about OneNote and taking on those challenges as well.

Have fun, and let me know if you're a Ribbon Hero like Clippy and me!

Sunday, May 1, 2011

Microsoft Access: Web Browser Control


I love how on websites you can click to view a map. Somehow the address fields are set to map to a mapping program, such as Google Maps or Mapquest, and you’ll see a map to your destination. You can now replicate this on your Access forms using the Web Browser Control.

First, go to your favorite map site (I found deciphering Map Quest was easier), type in your address (you'll delete this later) and locate it on the map. Copy the URL.
  1. On the Form Layout Tools|Design ribbon, in the Controls group, select the Web Browser Control, and then click to place it on the form. Access opens the Insert Hyperlink dialog box.
  2. Paste the URL of the web page into the Address: field of the Insert Hyperlink dialog box, and then press TAB on the keyboard to move to the next field. Access clears the Address: field and separates the URL into the appropriate fields.
  3. To set the control so that its URL changes based on the data that is displayed on your form, you must replace the appropriate URL components with expressions that refer to the appropriate controls on the form. Here's where having your address helps you locate the correct areas for your fields.
    1. Click the path or parameter that you want to replace, and then click the Build button.
    2. In the Expression Builder, double-click the control that contains the data you want.
    3. Click OK to close the Expression Builder.
  4. Click OK.

    Friday, April 1, 2011

    Microsoft PowerPoint: Broadcast Your Presentation over the Internet

    At UNL, we have an Adobe Connect server, which really helps us share our presentations remotely. I’ve used it and it works great, but I don’t always want to use this options for presentations over the phone and on the fly. If you have found yourself emailing a presentation to someone and then asking them to walk through it with you as you explained on the phone, you’ll like the Broadcast option.

    Before you begin, you must have a Windows Live, Hotmail, MSN or Xbox Live email account. No, gmail won’t work. You must also have access to the Internet which is how the presentation will be broadcast.

    1. With your presentation open in PowerPoint, go to the Slide Show ribbon, Start Slide Show (Play Slide Show on the Mac) group, and the click Broadcast Slide Show.
    2. Click the Start Broadcast button (Connect... on the Mac). 
    3. If you are not already logged in, you must log in with your Windows Live ID credentials.
    4. PowerPoint will create URL for you to email or copy into a a messaging service to whomever you want to join the broadcast. Be aware that this is not a secure or closed connection. Anyone with the URL can access your broadcast. You should also recommend the audience disable their screen saver or power saving options as this will disrupt their viewing.
    5. When your audience is ready, click the Start Slide Show button (Play Slide Show on the Mac).
      You are in full control of the presentation. When you advance the slide, your audience will stay on track with you.
    6. After presenting, press Esc (Escape) on the keyboard to end Slide Show view. You must then press the End Broadcast button on the yellow bar under the ribbon.
    Currently, only Internet Explorer, Firefox and Safari for Mac is the supported version. I've used Chrome without incident, but it's not an official supported browser.

    Some things to be aware of when broadcasting:

    • All transitions will be shown as the Fade transition only.
    • Audio or video is not transmitted with the presentation through the browser.
    • Website hyperlinks will not work.
    • You cannot make ink annotations on screen during the presentation.

    Tuesday, March 1, 2011

    Microsoft Excel: Sparklines

    Available in both 2010 for Windows and 2011 for Mac, Sparklines can be a nifty little option. If you love the dynamic line charts for your data, but wished it was available to put at the end of a row/column right next to your data, you’re in luck. Sparklines are for you.

    1. Place the cell selector on the cell(s) to display the Sparkline.
    2. On the Insert (Charts on the Mac) ribbon, Sparklines (Insert Sparklines on the Mac) group, select the type of trend to display.
    3. Enter the range of data to be included.
    4. The Location Range should be the cell you selected in step #1.
    5. Click OK

    Monday, February 14, 2011

    Happy Geek Valentines Day

    Here is a special Valentine message for you.
    x^2+(y-(x^2)^(1/3))^2<1
     Have trouble figuring it out? Plug it in to WolframAlpha.

    Friday, February 11, 2011

    Migration Guides

    How is it that I have not come across these before? Apparently, around the time of the release of Microsoft Office 2010, a few of Microsoft's bloggers created migration guides for Access, Excel, OneNote, Outlook, PowerPoint and Word. For some reason, I'm just now finding these fantastic guides. So, here are the Microsoft Office 2010 Migration Guides. ENJOY!

    Tuesday, February 1, 2011

    Microsoft Word: Quick Parts

    As a toddler, I’m sure many of you played with building blocks. As we get older, we can continue to play with building blocks. To make it sound more efficient, let’s call them Quick Parts. I’m all about being lazy (for the polictically correct, efficient), and Quick Parts works for me.

    Words comes with many of these built in Quick Parts (cover page, header, footer, etc.) You can use one of the built in cover pages, headers or footers, but I really prefer my own. NU Central Administration provides some nice letterhead templates where the header and footer are already done for you. You can use one of these or open a document that already has the header, footer or cover letter you want. The point is, you need something to copy or save for use later.

    Got it? Now select it. Next, go to Insert ribbon, Text group, click Quick Parts and select Save Selection to Quick Part Gallery… Add the necessary information in the dialog box. Be sure the name is something you’ll remember, like “UNL Header.” You will also need to select the appropriate category, like “Headers.”

    To insert your new Quick Part, place the insertion point where you’d like the part to appear. Go to Insert ribbon and select the item, like “Header.” In the gallery of optoins, you’ll find your part neatly alphabatized with the rest. Select it and there you go.

    Did you know you can also do this with boilerplate text? If you remember AutoText but didn’t know where it disappeared to in 2007-10, you’ll be happy to know it’s a Quick Part, too.

    Tuesday, January 25, 2011

    25 Years of EXCEL-lence

    On September 30, 2011, Microsoft Excel will celebrate 25 years. In this video, you'll see Nebraska-boy, Jeff Raikes, talking about his contribution and experience working with Excel.

    Friday, January 14, 2011

    PowerPoint for Mac 2011 at CES 2011

    Removing the background from images (which can also be done in Word) has been a great feature in both the PC and Mac latest versions. Thank you for making it so easy!

    Thursday, January 13, 2011

    Word for Mac 2011 at CES 2011

    Reading view in Mac 2011 is so much better than in PC 2010/07. And don't even get me started on the layers. Come on Word for PC development staff, we want this, too!

    Wednesday, January 12, 2011

    Office for Mac 2011 at CES 2011

    I've begun to play around with the new Office for Mac 2011 and written in the past that it's much closer to the PC version. But here is a great video that will help you get to know the new UI (user interface).

    Saturday, January 1, 2011

    Microsoft Office: Open documents that Office wants to block

    Old stuff ain’t safe. At least according to Microsoft. Therefore, when you try to open files in the 97-2003 file format (or earlier), Office 2010 will block editing (and macros) of these files until you decide they are safe. The problem arises when you upgrade, all your files are in the previous format and blocked from editing. You can easily click the Enable Editing button that appears in the yellow bar under the ribbon, but if you want to be proactive, you can change this setting.

    In Word or Excel, go to the File tab, click Options, click Trust Center on the left, and then click the Trust Center Settings.. button. On the left, select File Block Settings, and remove the checkmarks from the older Office files that you want Office 2010 to open. There are additional settings for how to open at the bottom of the dialog box.